Mediapipe integration
Mediapipe is a cross-platform framework for creating complex Computer Vision and Deep Learning pipelines both for offline and streaming applications. It includes support to OpenCV and TensorFlow. By integrating Lluvia in mediapipe, it is possible to leverage its runtime capabilities as well as the interfacing with other popular frameworks.
Setup
Platform
The following instructions are written for an Ubuntu host system.Follow the linux instructions to install the basic dependencies to build lluvia in your host machine.
Mediapipe
Clone the mediapipe repository in the same folder as lluvia.
| |
Setup Clang as default C++ compiler for mediapipe. Add the following line to mediapipe’s .bazelrc file
build:linux --action_env=CC=clang
Follow the installations instructions to configure OpenCV according to your installation. Also, enable GPU support. Once completed, run the hello_world application to check the build process:
| |
the output should look like:
I20221006 15:04:52.196460 12142 hello_world.cc:57] Hello World!
I20221006 15:04:52.196496 12142 hello_world.cc:57] Hello World!
I20221006 15:04:52.196501 12142 hello_world.cc:57] Hello World!
I20221006 15:04:52.196537 12142 hello_world.cc:57] Hello World!
I20221006 15:04:52.196563 12142 hello_world.cc:57] Hello World!
I20221006 15:04:52.196588 12142 hello_world.cc:57] Hello World!
I20221006 15:04:52.196615 12142 hello_world.cc:57] Hello World!
I20221006 15:04:52.196640 12142 hello_world.cc:57] Hello World!
I20221006 15:04:52.196666 12142 hello_world.cc:57] Hello World!
I20221006 15:04:52.196691 12142 hello_world.cc:57] Hello World!
Modifications to embed Lluvia as mediapipe’s dependency
The next step is to include lluvia as a dependency of mediapipe. Append the configuration below to mediapipe’s WORKSPACE file to configure lluvia as a local_repository:
| |
Rerun mediapipe’s hello_world binary again to confirm the new workspace configuration works:
| |
Extra configuration for Android builds
Install Android Studio, SDK 33 and SDK 30, and the NDK 21 (r21e). Configure the ANDROID_HOME and ANDROID_NDK_HOME environment variables in your .bashrc or .zshrc file, for instance:
| |
Install the default JDK and the ADB in the system:
sudo apt install default-jdk adb
WORKSPACE configuration
In addition to the WORKSPACE configuration mentioned above, add the following lines for Bazel to configure the Android SDK and NDK.
| |
lluvia-mediapipe repository
The lluvia-mediapipe project is an auxiliary repository containing the Calculators to interface with mediapipe. This repository needs to be cloned within mediapipe in order to consume its dependencies.
| |
The directory structure for all repositories should look like:
lluvia                          <-- lluvia repository
mediapipe                       <-- mediapipe repository
├── BUILD.bazel
├── docs
├── LICENSE
├── MANIFEST.in
├── mediapipe                   <--
│   ├── BUILD
│   ├── calculators
│   ├── examples
│   ├── framework
│   ├── gpu
│   ├── ...
│   ├── lluvia-mediapipe        <-- lluvia-mediapipe repository
├── ...
├── .bazelrc
└── WORKSPACE
Next, run the lluvia_calculator_test target to verify the build and the runtime is correctly configured:
| |
LluviaCalculator
The lluvia-mediapipe repository declares a new LluviaCalculator. This calculator is in charge of initializing Lluvia, binding input and output streams from mediapipe to lluvia ports, and running a given compute pipeline.
The figure below illustrates a basic mediapipe graph utilizing lluvia, while the code below shows the graph description using protobuffer text syntax

| |
where:
- The
enable_debugflag tells whether or not the Vulkan debug extensions used by Lluvia should be loaded during session creation. This flag might be set tofalsein production applications to improve runtime performance. - The
library_pathdeclare paths to node libraries (a.zipfile) containing Lluvia nodes (Container and Compute). This attribute can be repeated several times. - The
script_pathis the path to aluascript declaring aContainerNodethat Lluvia will instantiate as the “main” node to run inside the calculator. input_port_binding, maps mediapipe input tags to the mainContainerNodeport. In the example above, mediapipe’s input tagIN_0is mapped to lluvia’sin_imageport.output_port_bindingdoes the same for outputs of theContainerNode. Both input and output bindings have apacket_typeattribute indicating the expected type of the binding. Possible values are:IMAGE_FRAMEandGPU_BUFFER.
GPU_BUFFER support
Currently there is no support forGPU_BUFFER bindings. All bindings must be IMAGE_FRAME type.Android Archive build
The lluvia-mediapipe repo contains an example Android Archive build target that contains the LluviaCalculator as well as some mediapipe graph examples. To build the archive, run:
| |
The generated AAR file will be located at bazel-bin/mediapipe/lluvia-mediapipe/java/ai/lluvia/lluvia_aar.aar and can be exported into an Android project.
Examples
There are two example applications packed with lluvia-mediapipe
single_image
This app receives as command line arguments the path to an image file, a mediapipe graph definition and a lua script describing the ContainerNode to run inside of the LluviaCalculator.
The commands below execute the single_image app loading sample graphs packaged in the repository. The command assumes both lluvia and mediapipe repositories are cloned in the ${HOME}/git folder.
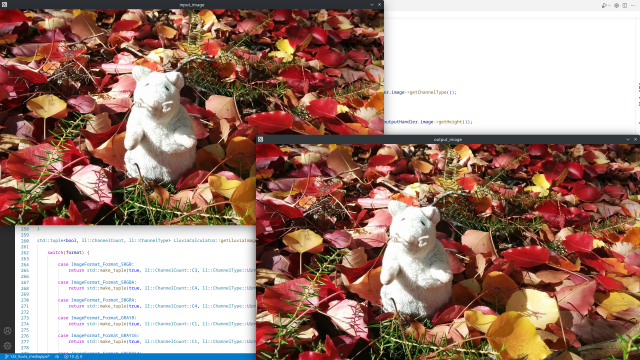
Passthrough
This graph simply copies the input image to the output, without any processing:
| |

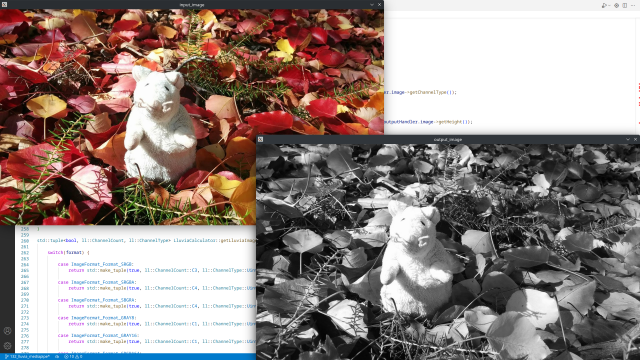
BGRA to Gray
This graph runs the lluvia/color/BGRA2Gray compute node to convert from the BGRA input to gray scale:
| |

webcam
This application tries to open the default camera capture device in the host system using OpenCV VideoCapture class. Then it feeds the mediapipe graph the captured frames to be processed by the LluviaCalculator.
BGRA to Gray
| |
Horn and Schunck optical flow
This is a more elaborate graph running inside the LluviaCalculator. First, the input image is converted from BGRA to gray scale, then is passes through the Horn and Schunck optical flow algorithm, and finally, the estimated optical flow is converted to RGBA (and then to BGRA) for visualization:
@startuml
skinparam linetype ortho

state LluviaCalculator as "LluviaCalculator" {

    state input_stream as "IN_0:input_stream" <<inputPin>>
    state output_stream as "OUT_0:output_stream" <<outputPin>>

    state ContainerNode as "mediapipe/examples/HornSchunck" {

        state in_image <<inputPin>>

        state BGRA2Gray
        state HS as "HornSchunck"
        state Flow2RGBA
        state RGBA2BGRA

        input_stream -down-> in_image

        in_image -down-> BGRA2Gray
        BGRA2Gray -down-> HS: in_gray
        HS -down-> Flow2RGBA: in_flow
        Flow2RGBA -down-> RGBA2BGRA: in_rgba

        RGBA2BGRA -down-> out_image <<outputPin>>
    }


  out_image -down-> output_stream <<outputPin>>
}

@enduml
The command to run the example is:
| |
References
Feedback
Was this page helpful?
Glad to hear it! Please tell us how we can improve.
Sorry to hear that. Please tell us how we can improve.